When you are taking photos of people, flowers, etc., be sure to also take pictures of things that might normally miss your notice - things you think of as background. Why? To use as backgrounds of course - for your scrapbook pages.
At the beach? Take a picture of the sand or the seafoam. Wedding? Be sure to get photos of the cake, food, champagne glasses, even the tablecloths.
Here is a very simple way to turn these background photos into backgrounds for your layouts.
Pull up your photo in Paint Shop Pro. If desired, use the selection tool with rectangle or square selection type and select just the portion of the photo you wish to use. Type control C control V to get this selection into its own image.
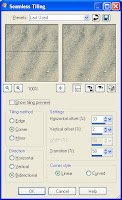
On the Effects menu, select Image Effects, then Seamless Tiling. The default selections will probably be what you want. Try a few out to see what they do.
Then save this file in My PSP Files\Patterns. You have saved your background.
To use the background, select New from the File menu to create a new image. Select the height and width dimensions for an entire scrapbook or photobook page. Make sure Transparent is unchecked, and click in the color and texture selection area. Click on the Pattern tab. Click the pattern selector and you will see the pattern you created. Select it. You may change the angle or scale if you like. If you want to see your background print on a diagonal, type 45 into the angle number selector. If you would like to see bigger images and fewer repeats in your background, type a larger number than 100 in the scale number selector. Click OK.
Click OK again on the New Image window.
You should have created a new image with a background made from a smooth repeated pattern from your original photo!


Thanks a ton it is a great help, now to make backgrounds from our photos with paint shop pro is definitely simple with your advice. Kudos
ReplyDelete