Showing posts with label "Paint Shop Pro". Show all posts
Showing posts with label "Paint Shop Pro". Show all posts
Sunday, January 3, 2010
Using templates in Paint Shop Pro
I stumbled upon this nice tutorial about how to use templates in Paint Shop Pro. http://mommyscraps.com/2008/09/06/using-a-template-in-paint-shop-pro/#comments
Tuesday, September 22, 2009
Nifty Use for Eraser Tools
 This is a fun and creative way to create a scrapbook layout that you can't do very easily if at all with traditional scrapbooking. This can be done with any photo editing software that has layers and an eraser tool (which is most, if not all of them).
Open a new file with a transparent background. Create a new layer and call it "frame". The frame used here is a freebie from Creative Memories (see link in right margin of blog). Load your frame into this new layer.
Then make a new layer and label it "photo". Place your photo on top of the frame, sizing it as desired.
Then move the frame layer up on top of the photo layer.
Then use your eraser tool. I used a couple of different opacities and a couple of different brushes to get this effect. To get that scratchy look I used an eraser tool shape in Paint Shop Pro called "surreal". Erase all the frame from the focal point of your photo, and erase some of it from the edges.
To keep the transparent background, save the file as a .png.
Labels:
"Eraser tool",
"Paint Shop Pro",
"photo editing",
frame,
grunge,
tutorial
Wednesday, August 19, 2009
Grunge
A lot of scrapbooking backgrounds and embellishments have a lovely distressed look to them. This seems to be very popular with both traditional and digital scrapbookers. I certainly like them.
Here is an example of one particular background that I really like, and it is a good example of what I am talking about: http://backgrounds.picaboo.com/Backgrounds/BGViewEntry.aspx?entry_guid=96057cfe7f6e43009a871e4501a63a71&catid=0&subcatid=0
But there are tons of them. Well I've been trying to figure out how to do this. The stock textures you get with Paint Shop Pro, and I imagine most other applications, are too uniform to achieve a look like this.
Well in my quest to figure out how to create this distressed look I've come across a term: grunge. Grunge brushes, grunge textures, etc. I have only begun my quest to create the perfectly grunged background. I haven't figured it all out yet. But I did come across this tutorial for how to make grunge brushes. It says it is written for GIMP or Photoshop, but Paint Shop Pro has all the same tools. I think it can easily be adapted. Haven't tried yet.
http://www.shadow-logic.net/2008/08/13/grunge-brush-tutorial/
But I have a whole new eye for taking photographs now! I want to take photographs of dirty, icky, scratched, marred, beaten, weathered anythings so I can use them to make grunge tools in my quest for the perfect scrapbook background!
Oh, and check out www.grungetextures.com for some grungy photos already available!
Friday, July 17, 2009
How to make backgrounds from your photos with Paint Shop Pro

When you are taking photos of people, flowers, etc., be sure to also take pictures of things that might normally miss your notice - things you think of as background. Why? To use as backgrounds of course - for your scrapbook pages.
At the beach? Take a picture of the sand or the seafoam. Wedding? Be sure to get photos of the cake, food, champagne glasses, even the tablecloths.
Here is a very simple way to turn these background photos into backgrounds for your layouts.
Pull up your photo in Paint Shop Pro. If desired, use the selection tool with rectangle or square selection type and select just the portion of the photo you wish to use. Type control C control V to get this selection into its own image.
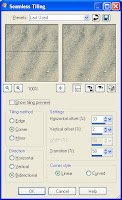
On the Effects menu, select Image Effects, then Seamless Tiling. The default selections will probably be what you want. Try a few out to see what they do.
Then save this file in My PSP Files\Patterns. You have saved your background.
To use the background, select New from the File menu to create a new image. Select the height and width dimensions for an entire scrapbook or photobook page. Make sure Transparent is unchecked, and click in the color and texture selection area. Click on the Pattern tab. Click the pattern selector and you will see the pattern you created. Select it. You may change the angle or scale if you like. If you want to see your background print on a diagonal, type 45 into the angle number selector. If you would like to see bigger images and fewer repeats in your background, type a larger number than 100 in the scale number selector. Click OK.
Click OK again on the New Image window.
You should have created a new image with a background made from a smooth repeated pattern from your original photo!
Wednesday, July 8, 2009
How to make letters from pictures with Paint Shop Pro

This is using Paint Shop Pro 9. But I imagine the process is similar with other photo editing sofware programs.
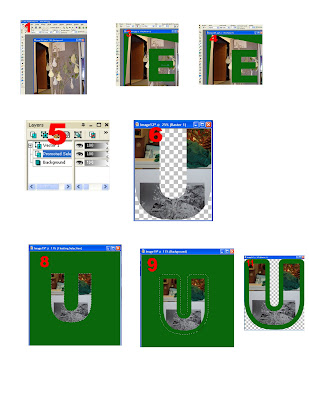
1. Open a photo.
2. If necessary, use the perspective correction tool to get a flat view of the object(s) in the photo.
3. Use the text tool to place a letter on the photo. Arial Black is a good font to use for this.
4. Use the wizard selection tool to select the letter. Use RGB value as the match mode. Get just the letter selected.
5. Right-click on the background layer in the Layers menu and select Promote Selection to Layer.
6. With the Promoted Selection layer selected, type control C control V to cut and paste your photo letter.
7. Create a new image with a solid color.
8. From the Edit menu, select Paste/Paste/Paste as New Selection.
9. From the Selections menu, select Modify/Expand.
10. In the dialog box, enter the width of the border in pixels.
11. Type control C control V to cut the matted letter into its own image.
12. Save your letter.
Subscribe to:
Posts (Atom)


